Before you commit to the mounting job
- Use your microwave’s installation instructions to check the opening, existing power and ventilation before drilling.
- The job runs from a stud-supported wall plate to upper-cabinet preparation, then lifting, bolting and plugging in.
- Plan on two people for mounting. Get professional help if electrical connections or ductwork need attention.
An empty space above your range is only the beginning. We’d check the installation instructions and existing services first, because this mounting procedure depends on a suitable opening with electrical connections and ventilation already in place.
Use this as a general installation overview alongside the exact directions for your appliance. Check the mounting kit against the parts listed in your instructions before starting, so you have the hardware the job calls for.
If you’d prefer to hand over the mounting job, Whirlpool offers professional installation and Maytag offers appliance service and delivery. Their Whirlpool installation overview (opens in a new tab) and Maytag installation overview (opens in a new tab) describe those options.
Check the height and door space
Measure your available space against the appliance’s installation instructions, including room for the door to open. The goal is a secure fit, with the clearances your model calls for.
Whirlpool’s general clearance guidance (opens in a new tab) gives 12 to 13 inches above the range and 66 inches from the floor to the top of the appliance. It also calls for at least 6 inches of clearance when there’s a wall on the left, so the door can open fully.
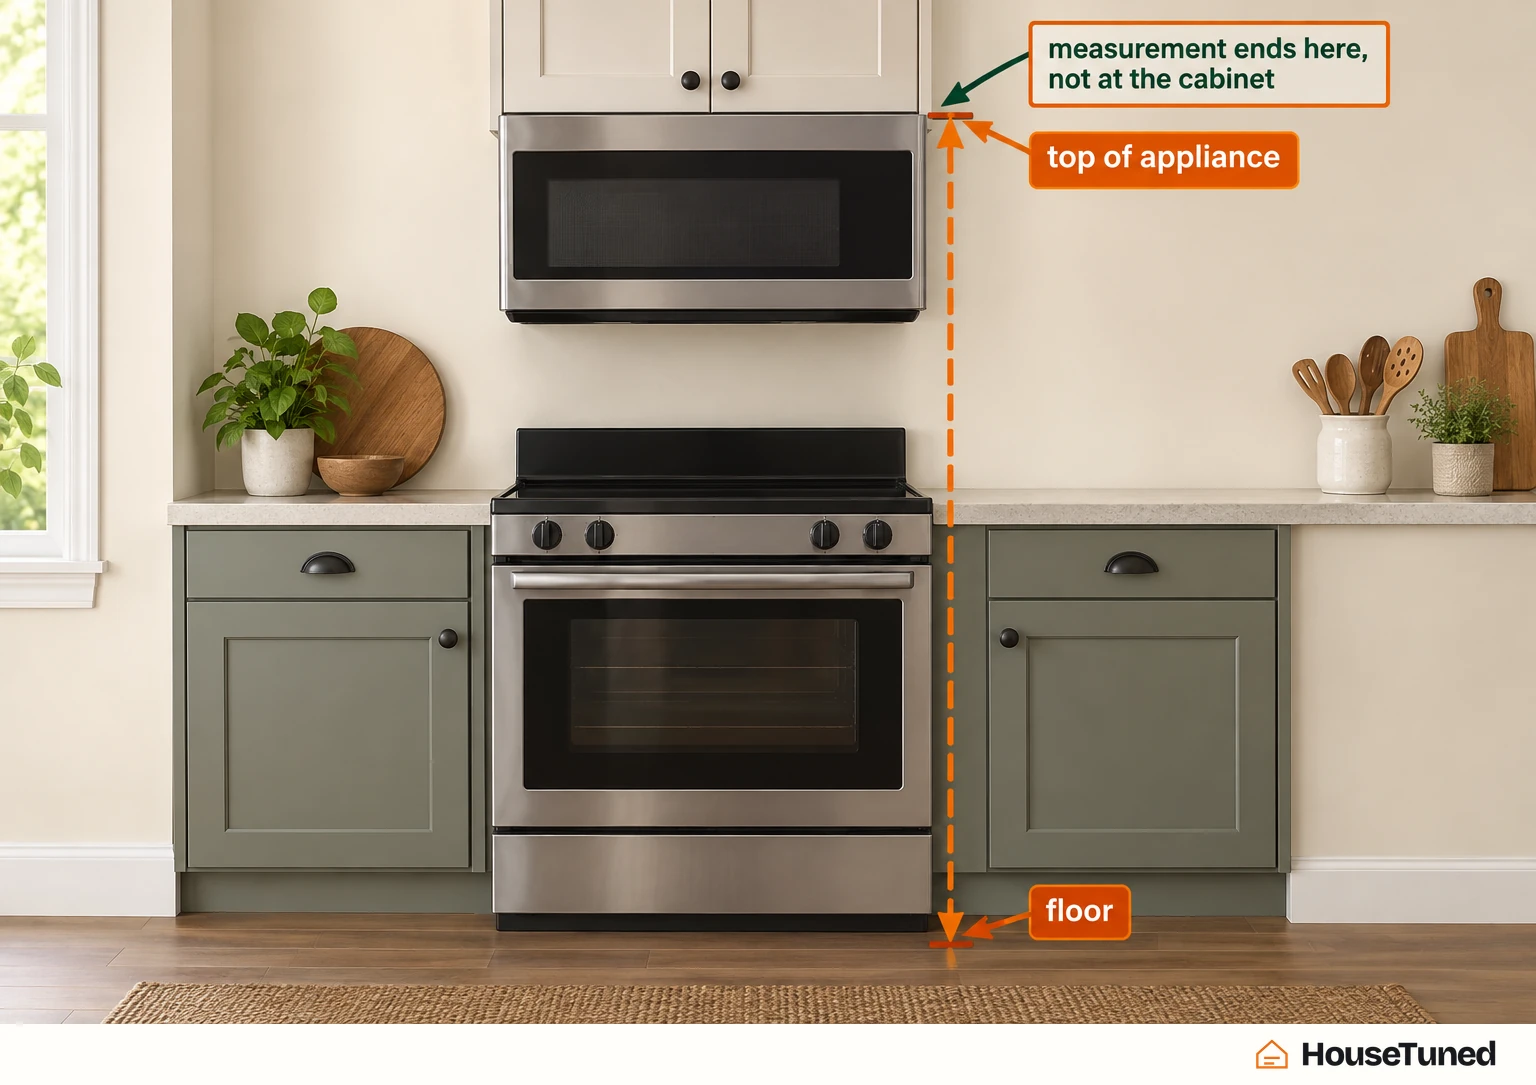
Use those as Whirlpool’s general figures and follow your product’s installation guide for its specific requirements. Keep the measurement references straight: the 66-inch figure runs from the floor to the appliance’s top.
A microwave that projects a few inches beyond the cabinet fronts can be normal. That extra space lets its door open all the way, and shallower cabinets can leave more of the microwave projecting into the room.
Decide how the air will circulate
An outdoor duct isn’t required for every over-the-range installation. Both manufacturers describe an indoor recirculating arrangement, where the fan circulates air indoors, as an available option.
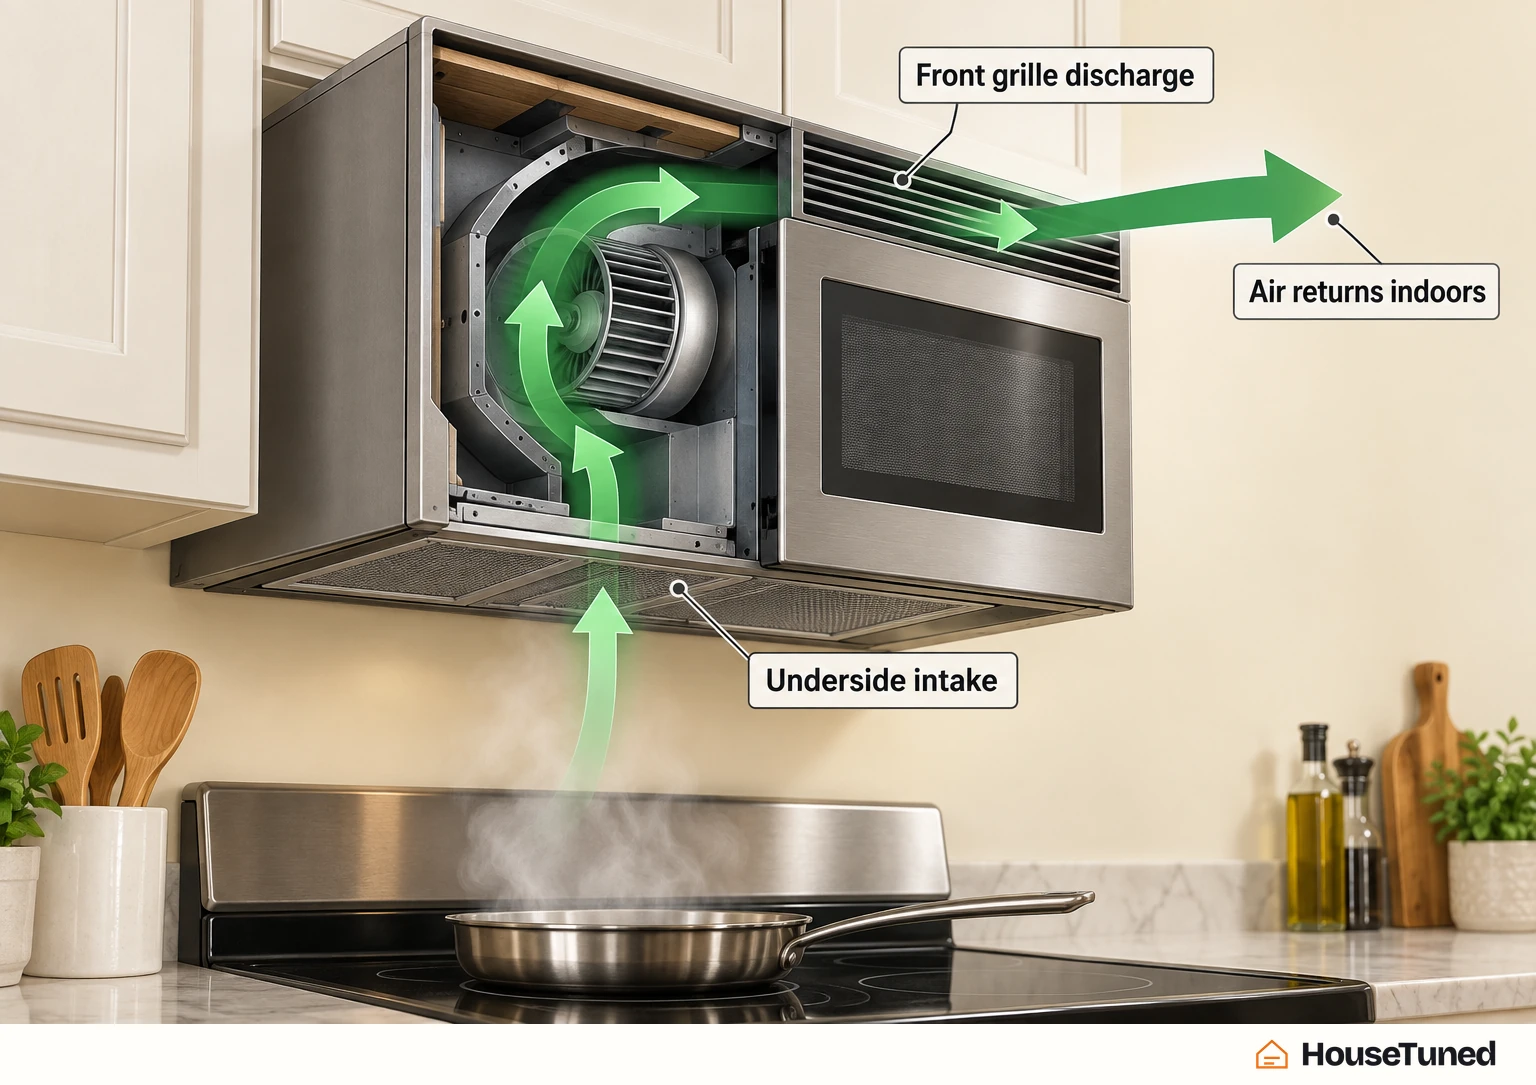
Match the planned installation to your appliance’s instructions and the ventilation arrangement already in place. Maytag’s installation guidance (opens in a new tab) assumes an existing opening with suitable electrical connections and ventilation, as does Whirlpool’s.
If you need an outlet added, ductwork installed, or help resolving electrical or ventilation concerns, consult a professional before continuing with mounting. Those services are prerequisites for this procedure.
Whirlpool worked example and work-area preparation
For the worked example below, use Whirlpool’s general over-the-range microwave procedure with your appliance’s own installation instructions. It covers preparing the work area, fitting the wall plate and upper cabinet, then securing the microwave.
Unplug the range and carefully move it out of the opening to clear the work area. Maytag’s preparation guidance explicitly calls for another person to help slide the range away.
Lay a drop cloth or towel on the floor to help prevent damage and contain the mess. With the range out of the way, you can begin the wall preparation described in Whirlpool’s mounting procedure (opens in a new tab).
Find the mounting plate in the microwave’s packaging. If it’s attached to the appliance’s back, carefully detach it and set it aside. For a Maytag appliance, its general guide also identifies the foam packaging as a possible location.
Find the studs before marking the plate
Use a stud finder beneath the upper cabinet to locate the wall studs. With a pencil and level, mark their locations and extend those marks downward as straight vertical lines, giving you references for the mounting plate.
Whirlpool requires the plate to attach to at least one stud and prefers two. If you can’t meet that requirement, consult your appliance’s installation guide before proceeding.
For a Maytag installation, locate the stud edges, mark each stud’s center and draw a vertical line down from that center. This is the stud-marking method in Maytag’s general mounting guide (opens in a new tab).
Mark, drill and fasten the wall plate
Your microwave may include separate cardboard templates for the rear wall and upper cabinet. In the Whirlpool example, carefully cut out the rear-wall template with scissors and keep the upper-cabinet template for the next stage.
The two template locations have different fallback instructions. Use the following distinction when preparing the Whirlpool wall and cabinet mounting points (opens in a new tab).
| Template location | If the cardboard template is absent |
|---|---|
| Rear wall | Use the mounting bracket as the template. |
| Upper cabinet | Consult the product’s installation guide. |
- Tape the rear-wall template in place with masking tape, or hold the bracket still against the wall. Set it level and flush against the upper cabinet’s bottom edge.
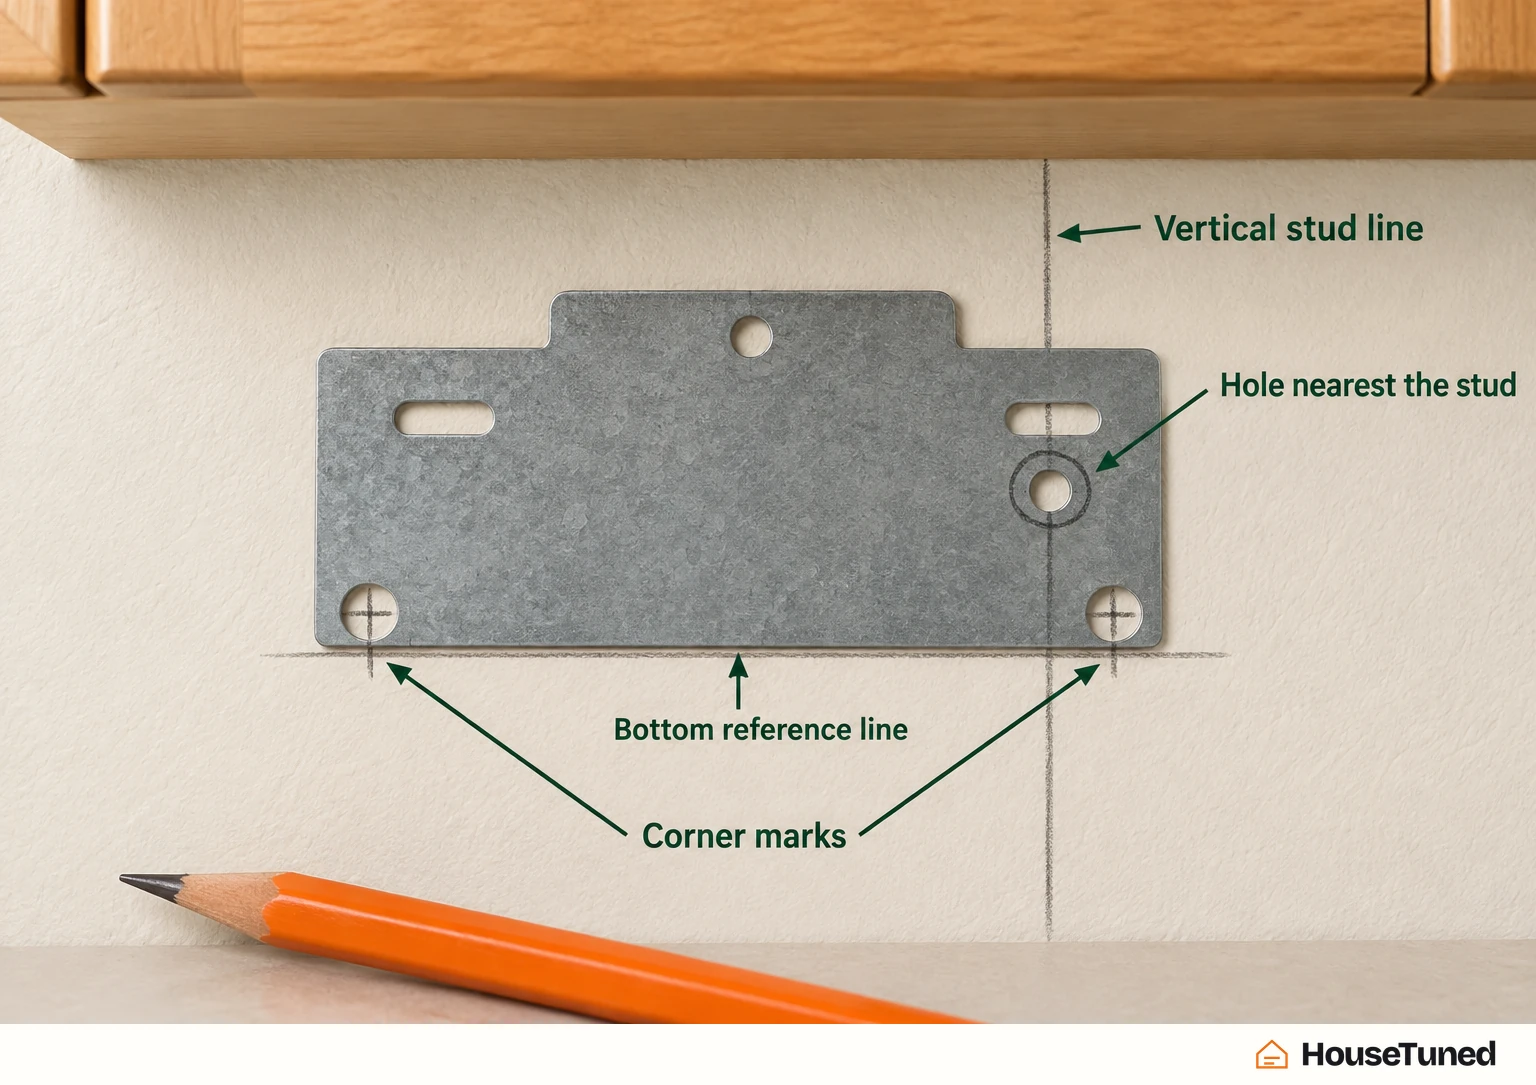
- Mark the drill holes near the bottom corners, then draw a horizontal line along the template or bracket’s bottom edge. You’ll have corner marks and a bottom reference line.
- Remove the cardboard template if you used one. Align the mounting plate with the bottom hole marks, centered against the wall and flush with your horizontal line.
- Hold the plate in place and find your vertical stud lines. Mark at least one hole through the plate closest to a stud line, leaving the stud-related fastening location marked.
- Carefully drill at the marked bottom-corner and stud locations. Align the bracket with those holes and secure it with bolts or lag screws as your model’s installation guide directs, leaving the plate fastened to the wall.
The corner marks and horizontal line establish the bracket’s position; the vertical marks locate the studs for attachment. Keep both sets of references in use as you align and fasten the plate.
Prepare the cabinet and cord opening
Empty the upper cabinet. For the Whirlpool example, place its cardboard template along the cabinet bottom, centered against the rear wall, with the template arrows also against that wall.
Follow the template to carefully drill the indicated power-cord opening through the cabinet bottom. This creates the route you’ll use to feed the cord into the cabinet while positioning the microwave.
For a Maytag installation, align the upper template’s centerlines with the vertical wall markings and place any rear-wall arrows against the rear wall. That orientation sets the power-cord opening’s location.
Maytag’s cabinet-opening instructions (opens in a new tab) describe using a keyhole saw to follow the template. Use your model’s installation guide for the opening’s size and exact cutting directions, so the cord can pass through.
Lift with a helper and secure the microwave
Before lifting the Whirlpool microwave, carefully remove the rotating plate and other loose contents from inside, then tape the door shut. Taping keeps the door from swinging open during installation.
Have your helper ready for the full positioning and fastening sequence. Whirlpool recommends two-person handling to help prevent appliance damage, and its lifting and bolting instructions (opens in a new tab) keep the helper supporting the unit while the upper bolts go in.
For a Maytag appliance, the general guide starts the lift by placing the microwave on the support tabs at the mounting plate’s bottom. Use your actual appliance’s instructions for its mounting interface and dimensions.
- For the Whirlpool example, lift with your helper and position the microwave in the opening. Tilt it toward you and feed the power cord through the prepared hole until the cord reaches the upper cabinet.
- Rotate the appliance upward and push it against the mounting plate. Keep it held in that position against the plate.
- While your helper continues holding the microwave, insert the supplied bolts through the upper cabinet into the appliance. Secure it and tighten the bolts as needed, following the model’s instructions, until the appliance is fastened.
At this stage, the appliance should be securely fastened, with the cord routed into the cabinet. Plug the microwave into the existing suitable power connection and clear the workspace.
More in this category